04/11/2015
Charlotte Bethany Henderson
100359031
The first task we were given this week was to create a tileable texture from an image we found online of something like a marble floor, or a cobbled street etc. Often if you try to make a tileable texture directly from an image without altering it, it doesn't work well, due to areas of shadow and light now matching up, as well as patterns not flowing well.
To fix this we put a High Pass filter over the image on a duplicated layer set to Luminosity to remove the wide tonal variety, making the shade in the image less obvious. Unfortunately this also removes a lot of colour, so you have to play around with the Levels adjustment settings to get back the colour and contrast. If you use the offset filter over the top of this image to create the tileable texture the image works far better and any discrepancies can easily be fixed with the clone tool.
To create the tileable texture you have to offset the image by half of its current size, for example if the image is 1024, the offset will be 512.
 |
| My tileable cobblestone texture |
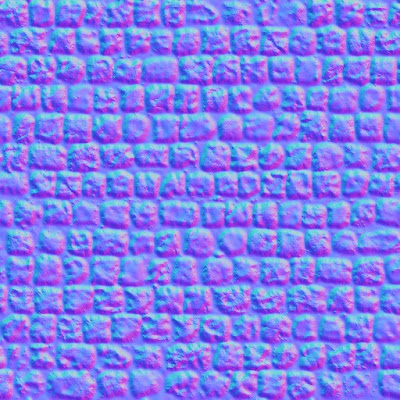
After we had created the tileable texture, we started looking at how to create normal maps from this diffuse map.
The first thing you have to do is to change the image mode to 16 bit from 8 bit, to prevent any issues arising in the image when you start working on the texture.
After this you have to create more depth in the image, which is done by going in and painting a midgrey between the cobbles and setting that layer to multiply, keeping the details in the crevices, but making it much darker. You then want to merge all of the layers together, then duplicate the whole thing, which you want to use a surface blur filter on, to soften all of the noisy details while leaving the big shapes intact.
After this you should run the X-normal - Height to Normals filter, making sure you turn on tiling so that the edges will tile cleanly. This now needs height adding to it. To do this we duplicate the layer and apply 1-3 pixels of Gaussian blur to it and set the layer to Overlay. This can be any number of times to create a wide variety of colours in the normal map. The final step is to run the Height to Normals filter again to ensure that all of the colours are within the Normal maps running range.
 |
| Normal map for the diffuse cobblestone map above |
Finally we need a specular map to show the smoothness of the cobbles as they age. To do this you simply create a greyscale version of the original diffuse map (with the painted multiply layer), use the Levels tool to push the cobbles to white and then set this layer to multiply over the top of the original diffuse map.
 |
| Specular map for the diffuse cobblestone texture above |